Showing posts with label mofo. Show all posts

Wednesday, September 26, 2012

VEGANMOFO 2012!

AHHH!!! MOFO!!! I cannot believe I almost forgot about the best month ever! It's time to dig out my camera and make my way back into the kitchen!

Sorry for all the neglect, my time's been pretty eaten up with the new Feminist Job
and stuff like 41 Days for Choice, but damned if i'm not gonna find some way to mix activism with vegan eating!

Thursday, October 1, 2009

VeganMofo: 100 Ways of Vegan (Meme)

VeganMofo III
And here we have it the first of possibly many, Veganmofo memes. This years list of 100 Vegan, a list composed of 100 vegan food items to measure up your street cred.

I stole this list from Jodie, The Picky Vegan. Who stole it from it's original creator Jenn, Tiny Choices. The rules are simple folks, steal this list from the blog you read it off of, giving props/credit/shout outs or plugs to those who posted before you and bold the ones you have eaten… please copy the list and paste it into the comments below, bolding the ones you’ve tried!

My total: 55%

1. Molasses
2. Cactus/Nopales
3.
Scrambled Tofu
4.
Grilled Portobella Caps
5. Fresh Ground Horseradish
6. Sweet Potato Biscuits
7. Arepa
8.
Vegan Cole Slaw
9.
Ginger Carrot Soup
10. Fiddlehead Ferns (oh how I miss you)
11.
Roasted Elephant Garlic
12. Umeboshi
13. Almond Butter Toast
14. Aloe Vera
15. H and H Bagel NYC
16.
Slow Roasted Butternut Squash
17. White truffle
18. Fruit wine made from something other than grapes
19. Freshly ground wasabi
20. Coconut Milk Ice Cream (not store bought)
21.
Heirloom tomatoes
22.
Orchard-fresh pressed apple cider
23. Organic California Mango (in season Sept-Oct only)
24.
Quinoa
25. Papaya Smoothie
26. Raw Scotch Bonnet (habanero) pepper
27. Goji Berry Tea
28.
Fennel
29.
Vegan Chocolate Chip Cookie
30. Radishes and Vegan Buttery Spread
31. Starfruit
32.
Oven fresh Sourdough bread
33. Sangria made with premium fruit and juices
34.
Sauerkraut
35. Acai Smoothie
36. Blue Foot Mushrooms
37. Vegan Cupcake from Babycakes nyc
38.
Sweet Potatoes and Tempeh combo
39.
Falafel
40. Spelt Crust Pizza
41. Salt and Pepper Oyster Mushrooms
42. Jicama Slaw
43. Pumpkin Edamame Ginger Dumplings
44. Hemp Milk
45. Rose Champagne
46. Fuyu
47. Raw Avocado-Coconut Soup
48. Tofu Pesto Sandwich
49. Apple-Lemon-Ginger-Cayenne fresh-pressed juice…with Extra Ginger
50.
Grilled Seitan
51. Prickly pear
52. Fresh Pressed Almond Milk
53. Concord Grapes off the vine
54.
Ramps
55. Coconut Water fresh from a young coconut
56.
Organic Arugula
57.
Vidalia Onion
58. Sampler of organic produce from Diamond Organics
59.
Honeycrisp Apple
60. Poi
61. Vegan Campfire-toasted Smores
62.
Grape seed Oil
63.
Farm fresh-picked Peach
64.
Freshly-made pita bread with freshly-made hummus
65. Chestnut Snack Packs
66. Fresh Guava
67. Mint Chocolate Chip Oatmeal Cookies

68. Raw Mallomar from One Lucky Duck, NYC
69.
Fried plantains
70.
Mache
71.
Golden Beets
72. Barrel-Fresh Pickles
73.
Liquid Smoke
74.
Meyer Lemon
75. Veggie Paella
76.
Vegan Lasagna (raw optional)
77. Kombucha
78. Homemade Soy Milk
79. Lapsang souchong
80. Lychee Bellini
81.
Tempeh Bacon
82.
Sprouted Grain Bread
83. Lemon Pepper Tempeh

84.
Vanilla Bean
85.
Watercress
86. Carrot you pulled out of the ground yourself
87.
Vegan In-Season Fruit Pie
88.
Flowers
89.
Corn Chowder
90. High Quality Vegan Raw Chocolate
91.
Yellow fuzz-free Kiwi
92. White Flesh Grapefruit
93. Harissa
94.
Coconut Oil
95. Jackfruit
96.
Homemade Risotto (Gasp! this will have to change)
97.
Spirulina
98. Seedless ‘Pixie’ Tangerine
99.
Gourmet Sorbet, not store bought
100. Fresh Plucked English Peas

VeganMofo: Secret Training: How to season your cast iron ware

A good seasoned cast iron grill or skillet is every vegan's best friend. Now some people might try and tell you that lard is the only way to treat these bad babies but those people are just plain silly!
Seasoned Pan
You have taken the first step in improving your life and seasoning your cast iron goods, let's begin.

Things you will need:
-Vegan solid shortening (I used earth balance brand)
-Pastry brush or small paint brush
-Cast iron pans
-All natural dish soap
-Scrub brush


Step 1: Scrub the heck outta those babies!!

Step 1: You scrub

Assemble your cast iron gear, done your rubber gloves and run that hot water! Take your brush and scrub hard, make sure you scrub all over with lots of soap and hot hot water. Once clean, towel dry completely! and move onto step two.

Step 2: Some Assembly required

Before you begin, preheat your oven to 350. (Check you oven temperatures and make sure it is at 350, those dials on the top lie! So trust your thermometers and adjust accordingly.)

*you might also want to place some foil at the bottom of the oven to catch any drippings*
Cast iron ware await seasoning
One you've washed and dried all your gear it is time to melt your shortening. Take you stick (or half depending on the size) and place it into a microwave safe container.Earth Balance Shortening for seasoning pots Microwave for about 2 minutes until liquid.


Step 3: The messy bit


Now here comes the get your hands dirty part, using your brush apply the melted shortening evenly in coats all over your pans. I would suggest an extra heavy layer on the cooking surface and bottom. It is probably best to do the top and handle before lifting the pan to coat the outsides and bottom. BE CAREFULL! Your heavy and lovely pots are greased and slippery, we don't want any broken toes or kitchen tiles.

Step 3: Brush on your shortening

Step 4: Hot potatoe

As you grease your pans place them into the oven asap, you don't want to put them down anywhere as they will make a mess. So straight into the oven with them. And move onto the next one.

Once every pan has been greased and moved into your hot oven allow them to bake for an hour. When the hour is up, simply turn off the oven and allow it to gradually return to normal temperatures and you will have lovely seasoned pots and pans.

Wednesday, September 30, 2009

VeganMofo: The construction of a Vegan Kitchen part 1

Greetings mofo'ers!

As vegan mofo begins I'll be working on my new kitchen getting things unpacked, organized and built for maximum vegan goodie production. As such Mofo so happens to fall shortly after move-in, which brings me to our very first Mofo post: Vegan Kitchen construction an epic adventure in culinary spaces I hope to keep you updated on as mofo progresses.

Give the massive scope of our accumulative kitchen gizmo's we realized that appliance access and storage was going to be one of our main concerns. As such I decided to convert one of our two coat closets (who puts a coat closet in the kitchen?) into an appliance cabinet. And as such our very first bit of kitchen reno began (oh lord, I might be turning into my mother).

After gaining the needed approval of our landlords we set to work one of the easiest (while remaining sturdy) method of cabinet installation. Essentially, your entire shelving unit is composed of one pieces of 8 by 3 4 ply ply wood and some deck screws.


Party watched while we did all the work.


Once the shelves themselves we cut the remaining board was cut into two inch widths and cut to the depth and length of our closet space. After helping Adam get the drill adjusted properly we measured our appliances for height and set the boards accordingly.

We downloaded an iphone app to help with the levelling, which is one of the most important steps. However, if you happen to find yourself with an uneven shelf don't panic. You can easily remove and readjust or use scrap pieces of wooden shingles to adjust to your desired height.

The support boards where then fastened to the wall and our shelves sat on top. For added support we chose to nail our boards down, but this isn't necessary. The selves will sit just as well without being nailed down and give you the flexibility to adjust, add or subtract shelves.


Finally because we opted for the cheaper untreated, unfinished board we'll be purchasing contact paper to cover the tops of our new shelves to make a nice finished surface for our appliances.


And voi-la instant kitchen storage. This space could also be used as a pantry for dry goods, baking supplies and any other necessities.


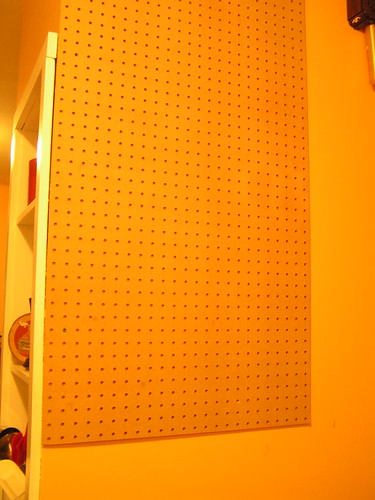
Another storage utility are peg boards, which can be used to hang pots, pan and baking equipment. We've only just begun to fasten ours to the wall but I will be sure to update you guys on the finished product. Be sure when you are hanging your peg board that you have something to space it off the wall. Something as simple as wine corks cut into quarters or halves and glued to the back of the peg board should be enough to lift it off the wall.

Hope you've enjoyed this little work in progress tour and early mofo sneak peek. See you all tomorrow for another day of Mofo'ing.